The Beginners Guide to Google Tag Manager for SEO
Google Tag Manager is an essential tool for website owners, website managers and SEO professionals. It provides a simplified route to implement code onto a site without the need for a developer, or specialist coding knowledge. Whilst Google Tag Manager is not a replacement for developers, it can be used for simple implementations such as event tracking and engagement metrics.
This kind of data collection is imperative for businesses. It can feed into the strategy, helping stakeholders to make key business decisions. Google Tag Manager can offer insight into how people use the site, how conversions are impacted by on-site changes or marketing activities, as well as ensuring that user data is accurately collected.
Not everything can be tracked in Google Analytics alone. Google Tag Manager is a way of joining up data sources so that you can create useful reports that offer real actionable insights.
If you’ve never used GTM before, it can look daunting. It’s important to understand the concept of Google Tag Manager before trying to implement tags on your site. This will allow you to understand the reason behind your actions and make it easier when you come to set up your tags.
We take a look at what Google Tag Manager is, how it should be used from an SEO point of view and how to set up tags for common event types.
Contents:
- What is Google Tag Manager?
- What is Google Tag Manager used for?
- Event tracking with Google Tag Manager
- FAQs
What is Google Tag Manager?
Google Tag Manager is a Tag Management System (TMS) that allows you to deploy code onto your website. Predominantly used for the implementation of tracking codes, site analytics and remarketing, tag manager allows users to create and track tags in a user-friendly interface.
Similar to a Content Management System (CMS), GTM provides a dashboard in which users can create and deploy tags without the need for a developer. Initial setup of the tag manager container may require developer support however.
Built on 3 main pillars, GTM utilises tags, triggers and variables to understand what data you want to collect, under what conditions and where this data should be stored.
Read on to learn about these 3 pillars in more detail.
Tags
Tags are essentially pre-packaged pieces of code that send data to your chosen analytics platform.
Throughout this blog we are going to look solely at Google Analytics. This means that your tag type will usually be ‘Google Analytics: Universal Analytics’ or ‘Google Analytics: GA4 Event’ depending on which version of the platform you are using.
These segments of code are provided by analytics, as well as external sources such as marketing software providers. They allow you to integrate their products into your website in order to track success and accurately assess ROI and strategy efficacy.
There are many different tag types supported by Google Tag Manager, however you can also set up custom tag types or utilise the Community Template Gallery. These are custom tags that have been created by other users and have been added to the template gallery to be accessed by all. They are removed if not properly maintained therefore this can be a great way to set up custom tags if you do not have access to developer support.
Triggers
Triggers determine under what conditions your tag (piece of code) fires.
Triggers are connected to specific tags, allowing them to fire in response to certain events. This could be a button click, a form submission or more. Triggers ‘listen’ to your website to identify when such an event has occurred, sending a message to your tag when the event is detected.
A tag is unable to fire unless it has a trigger connected to it.
Variables
Variables are named placeholders that are populated when code runs on your website.
Variables have two main functions:
- Within tags – variables are used to pass on dynamic information to Google Analytics. By dynamic information, we mean values that change depending on the action.
- For example, a product name, price, transaction value etc.
- Within triggers – variables are used to define filters that determine when a particular tag should fire.
- For example, you could specify a tag to fire when the ‘click text’ variable equals ‘add to basket’
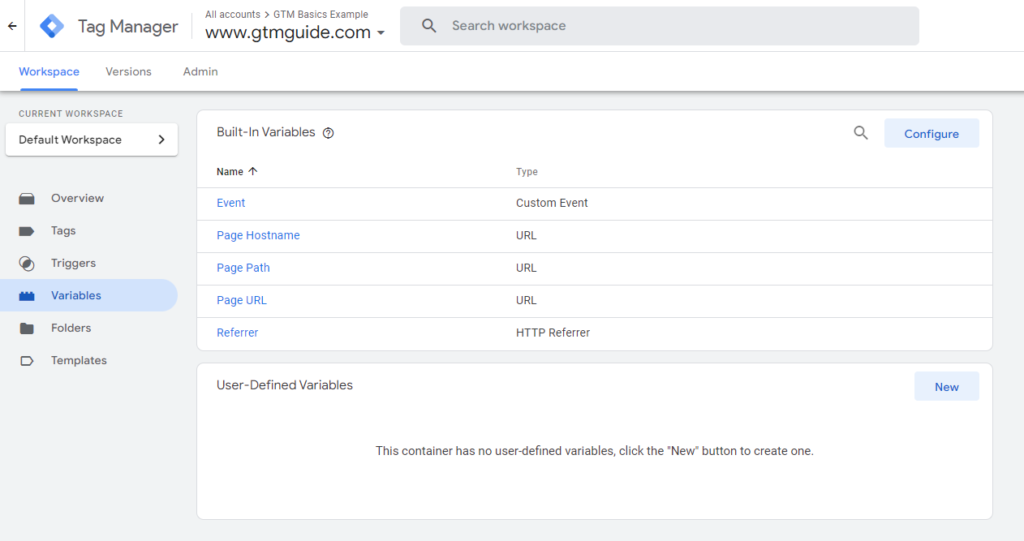
Tag manager has a wide range of ‘Built-In Variables’ that can be configured. You can also set up ‘User-Defined Variables’ if you have very specific requirements.
What is Google Tag Manager used for?
Google Tag Manager can be used for a whole host of requirements. The most common types include:
- Implementation of Google Analytics tracking codes
- Implementation of Meta Pixel
- Remarketing
- Event tracking
For SEO, the most common use is tracking to understand how users interact with your site, conversion metrics and sometimes for testing purposes.
Google Tag Manager and SEO
When implementing an SEO strategy, you need a way to track your progress to understand what is and isn’t working well. Utilising Google Tag Manager can provide you with key data about how your users interact with the site and the impact your SEO work is having.
For SEO purposes, it is important to track conversion metrics such as contact form submissions or transactions.
Conversions will mean different things to different businesses and site types. If you are using Universal Analytics, you can track ecommerce data directly in analytics. You may therefore only need to use GTM for other conversions and events that cannot be tracked directly through UA. If you are using GA4 however, the easiest way to begin collecting ecommerce data is via Google Tag Manager.
When optimising a site for SEO, the general aim is to increase traffic. There may also be additional aims such as increased sales, increased leads and increased engagement or brand awareness, depending on your business priorities and website type.
Implementing tags that correspond to these metrics allows you to track performance, and can also offer insight into additional opportunities.
For example:
If the aim of your SEO activities is to increase sales: you may optimise your product and category pages. You could implement tags for metrics such as ‘add to basket’ button clicks, ‘shop now’ button clicks, or for ecommerce data such as purchases, product clicks and refunds, if using GA4. If your optimisations have been successful, you should see these metrics increase over a period of time.
Please note, you will need to take into account other factors such as the industry and seasonality also.
If these metrics do not increase, but traffic to related pages has, this could tell you that there are usability issues, or Conversion Rate Optimisation opportunities.
If the aim of your SEO activities is to increase engagement: you may focus on optimisations that keep users on the site such as adding internal links to key pages, adding interactive page elements or optimising content for intent to keep users engaged for as long as possible. To assess the success of these strategies, you can implement tags to track scroll depth and link clicks.
This can offer insights into content positioning, user-preferred content types, link placements and more.
E.g.
- If key content is consistently missed as users do not scroll down the page far enough, this content should be moved
- If links are not being clicked, investigate if the link is relevant or whether placement or anchor text could be improved further
If the aim of your SEO activities is to increase leads: you may focus on optimising service pages and adding CTAs to encourage contact form submissions. You can implement button click tracking on contact us buttons as well as form submission tracking. This will allow you to see the drop off between those looking to contact and those who actually do. This could provide insight into the style of your contact form – if it is too long, it could detract users from completing the form.
Form submission tracking will also provide insight into the placement of CTAs, as well as the effectiveness of on-page copy.
Whilst tag manager can provide insight into SEO progress and new opportunities for almost any site, for larger sites, it can be used for A/B testing. When A/B testing you may test out different user interfaces, different content types or layouts, and even different button colours. Implementing the same tracking tags on each allows for direct comparisons to be made and the impact on organic traffic and user behaviour to be analysed.
How to use Google Tag Manager with Google Analytics
Using Google Tag Manager is all well and good, but you need to send the data somewhere in order for it to be useful. When it comes to SEO, the best place to send GTM data is Google Analytics.
By setting up tags to send data to your Google Analytics events, you can then set up goals and create reports with all your data in one place. This streamlines the process but also allows you to filter and slice the data using the Google Analytics interface.
For SEO, this means that you are able to apply the organic filter and assess how your events and goals are performing in relation to organic users alone. You can also compare between user types, e.g. direct vs organic, or apply specific date ranges and comparison dates. This ability allows for in-depth analysis that can result in actionable insights to help improve yours or your client’s site!
Learn how to connect your Google Tag Manager account to Google Analytics
Event tracking with Google Tag Manager
Now you know why Google Tag Manager is important for SEO, you may be wondering how to go about setting up your tags in order to start tracking events.
If you don’t have Google Tag Manager installed on your site already, you will need to do this first. You will then need to decide what kind of things you want to track. This will be different for each business depending on your offering and internal business goals.
Common event types include:
- Button clicks (e.g. add to basket, shop now, link clicks)
- Form submissions (e.g. contact forms, newsletter sign ups)
- Scroll depth tracking
- PDF downloads
The following sections look at how to set up Google Tag Manager and how to track the most common event types for your SEO campaign.
How to set up Google Tag Manager
If you do not have a Google Tag Manager account already:
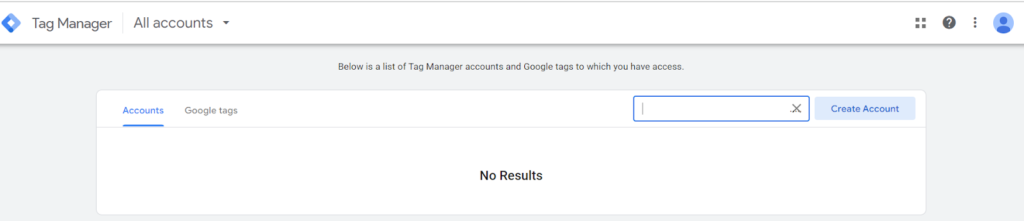
1. Navigate to GTM and select ‘Create Account’
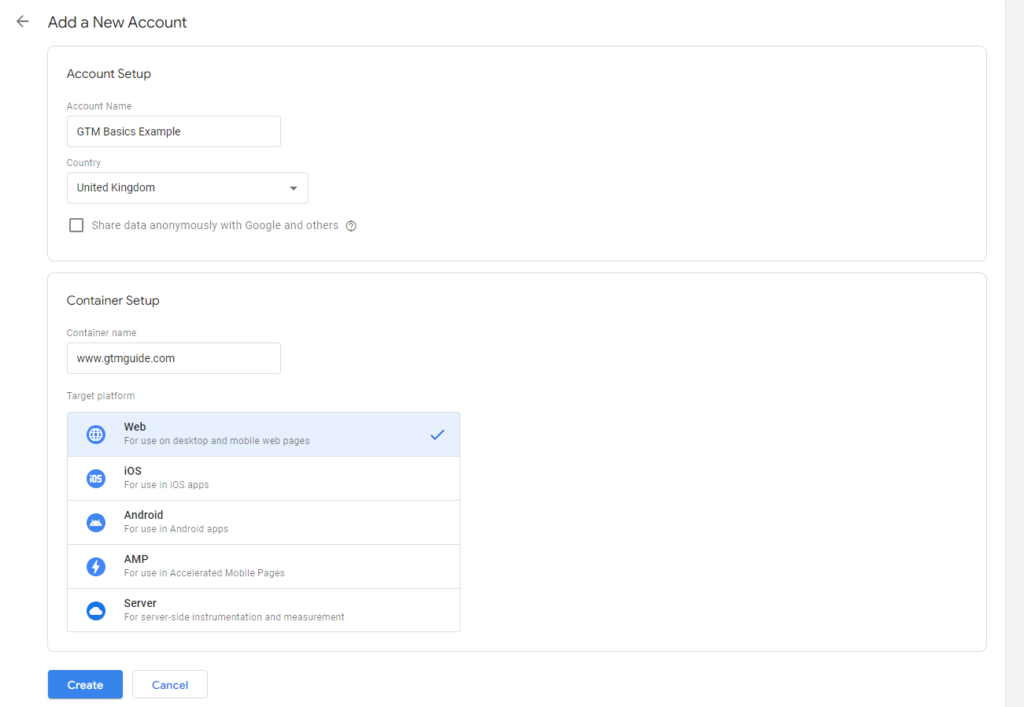
2. Fill in your site details and select ‘Create’ – for the most part the target platform will be ‘Web’ however GTM can also be installed on apps
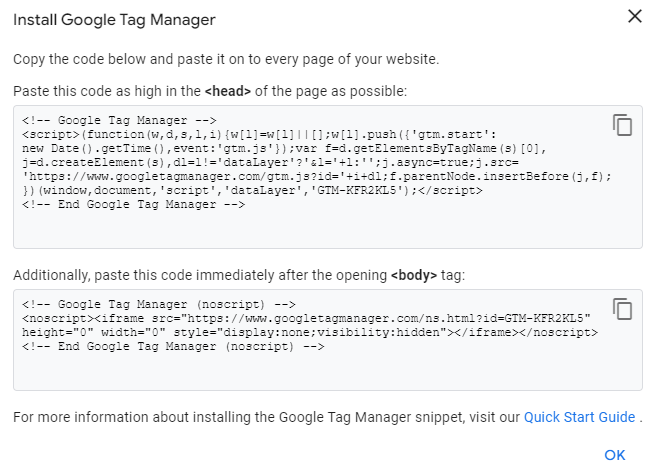
3. You will then be presented with 2 snippets of code that need to be added to your site in order to add the GTM container.
The first snippet of code will need to be pasted as high in the <head> of your site as possible (often just underneath your GA tracking code). The second snippet of code will need to be pasted directly after the opening <body> tag.
Your tags will not appear on the site or fire until this has been implemented. In most cases, this will require developer implementation. Some CMS platforms such as WordPress have plugins that allow you to do this without a developer if required.
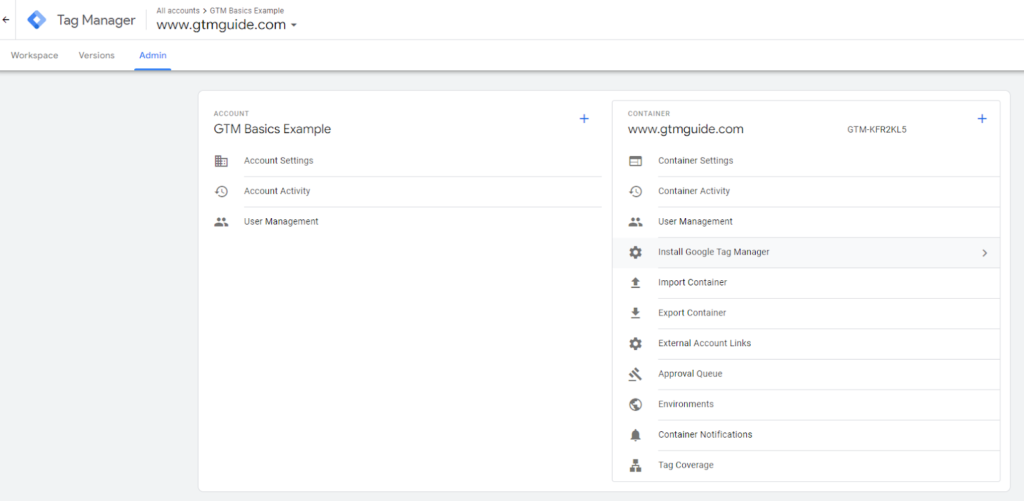
You can view this code at any time by navigation to ‘Admin’ > ‘Install Google Tag Manager’ under the ‘Container’ menu
4. Once GTM is installed on your site, you need to set up a ‘User-Defined Variable’ for your Google Analytics account. Doing this allows you to send the data to your GA profile when creating tags.
To do this, navigate to ‘Variables’ from the main dashboard and scroll down to ‘User-Defined Variables’ and select ‘New’
Name your variable something descriptive such as ‘GA Variable’ and select ‘Google Analytics settings’ as your variable type. Copy and paste your tracking code across from Google Analytics into the ‘Tracking ID’ box and press save.
You can find the tracking ID under ‘Settings > Property > Tracking Info’ in Google Analytics.
5. Once you have done this, configure your ‘Built-In Variables’ – new GTM profiles will only have 5 variables enabled. This means you are limited with the information you can send to GA and utilise in your triggers.
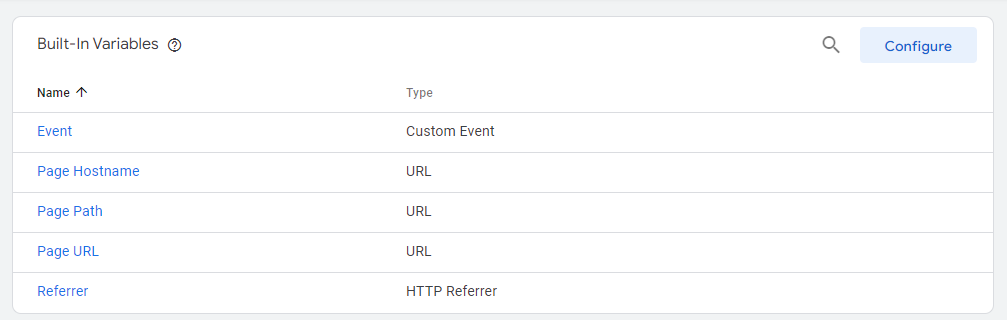
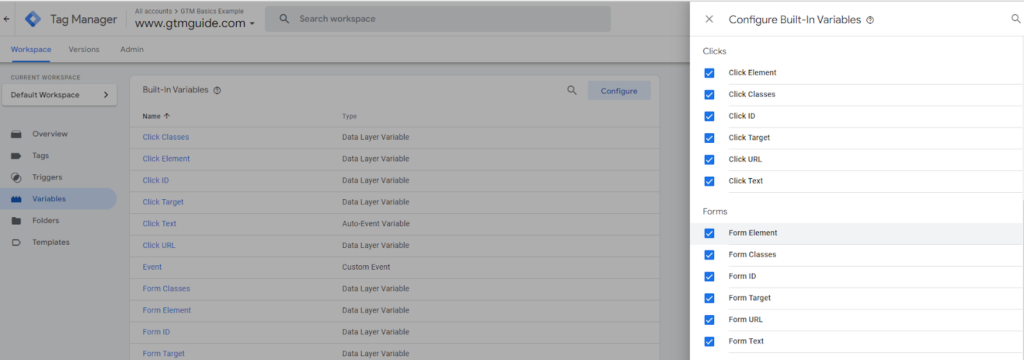
Press ‘Configure’ and select the variables you are likely to need. For example, if you want to track a button click, select the ‘Clicks’ variables. If you want to track a form submission, select the ‘Forms’ variables.
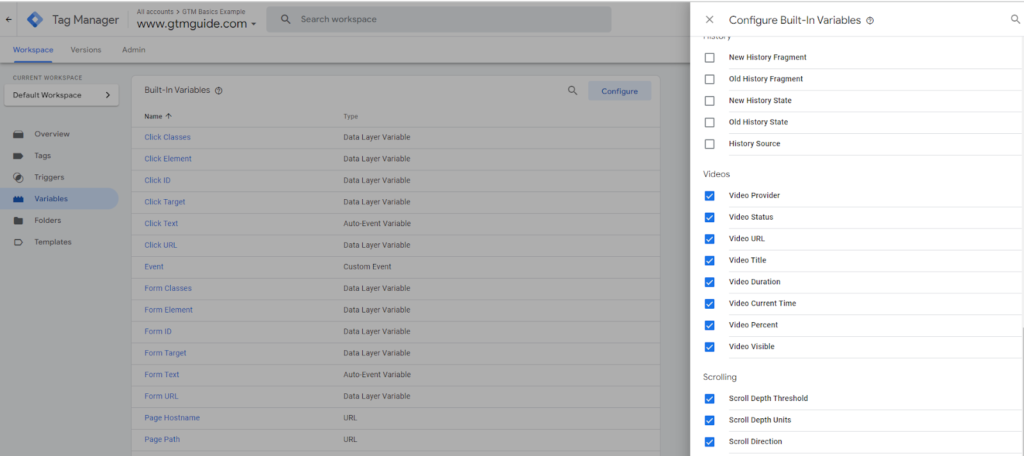
Because we are going to look at button clicks, forms and scroll depth in this guide, we have selected all of the relevant variables.
You are now ready to start setting up your tags!
If you are using GA4, you will need to set up a configuration tag in order to allow traffic to be collected in GA, as well as allowing data to be sent via your tags.
Setting up a GA4 configuration tag
Unlike with Universal Analytics, you do not need to set up a User-Defined Variable to send data to GA4. You need to set up something called a ‘Configuration Tag’ instead.
1. To do this go to ‘Tags’ in the sidebar and select ‘New’ – name your tag something descriptive such as ‘GA4 Configuration’
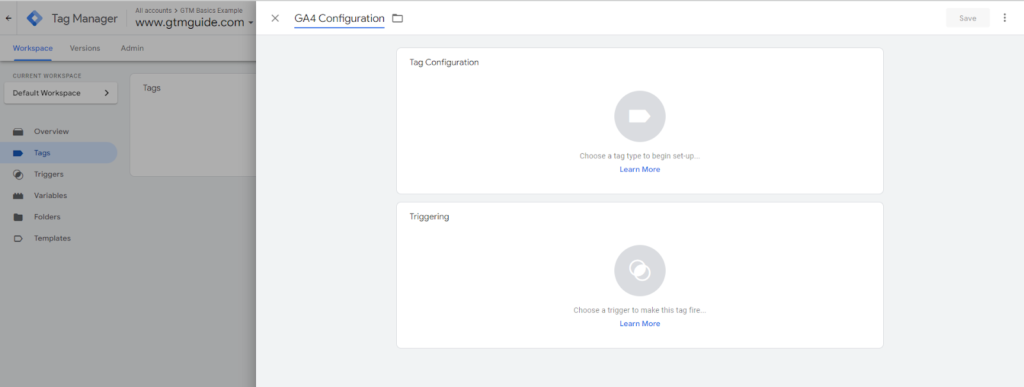
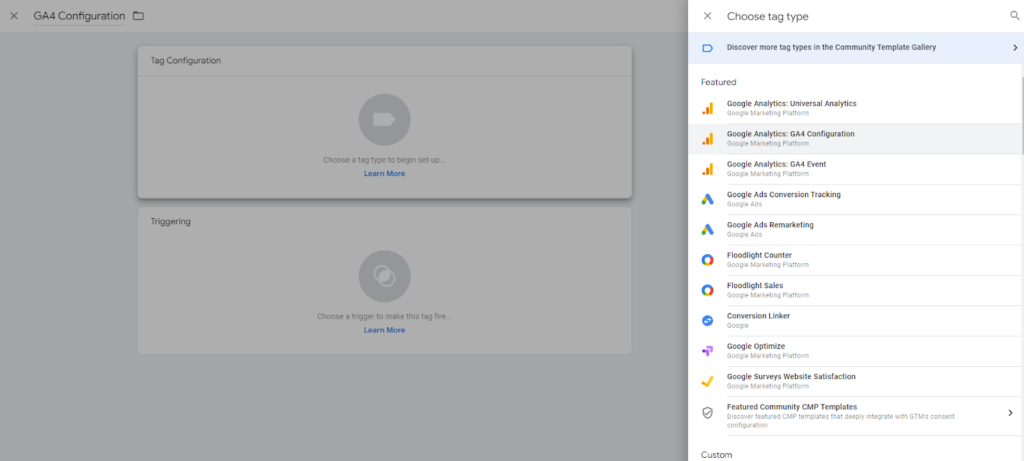
2. Select ‘GA4 Configuration’ as your tag type
3. Copy and paste your measurement ID from GA4 into the ‘Measurement ID’ box
You can find the Measurement ID under ‘Settings > Property > Data Streams > {Data Stream}’ in GA4
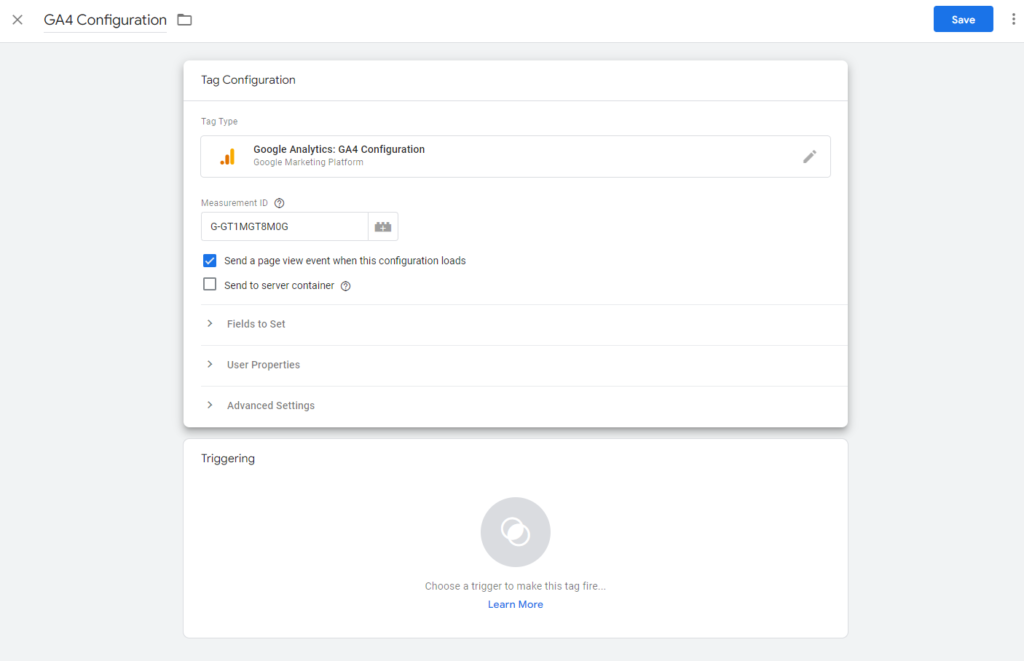
4. Select the ‘Triggering’ box, choose ‘All Pages’ as your trigger type and click save. This will allow all traffic data to be sent through to GA4.
If you have set up GA4 without using tag manager you do not need to do this step.
You will still need to set up the configuration tag so that you can send event data to GA4.

Setting up button click tracking in Google Tag Manager
To set up button click tracking:
1. Go into ‘Preview’ mode (top right corner) – this will open a debugging window that allows you to see how GTM views certain elements of your site.
Relevant click variables must be enabled otherwise you will not be able to view this information in preview mode.
Anything you do on the debug version of your site, will appear in the above window.
2. Click the button you want to track and navigate back to the preview window. This will appear as a ‘Click’ in the sidebar.
If you have to do multiple clicks to find the button you want to track, make sure you select the correct click from the side bar (this will be the latest one if you do not click anything else after clicking your desired button).
3. Select the ‘Variables’ tag and scroll down to look at the different click variables – this tells you all of the variables associated with your button.
You are looking for something unique that will allow you to track the click.
In this instance, if we want to track a Shop Now button, ‘Click Classes’ looks relatively generic, ‘Click Element’ is quite long – the best variable is probably ‘Click Text’
4. Leave this window open but go back into your GTM dashboard. Select ‘New Tag’ and name it something descriptive such as ‘Shop Now Button Click’ in this case.
5. Select ‘Google Analytics: Universal Analytics’ as your tag type, choose ‘Event’ from the drop down box (this ensures that the data is sent to the events section in Google Analytics), populate the necessary event tracking parameters and select your Universal Analytics variable from the ‘Google Analytics Settings’ drop down.
The ‘Event Tracking Parameters’ boxes are the information that will get sent through to GA. For example, if you select ‘Click Text’ as the variable for category – whatever the button’s click text is will be pulled through into the Category column in GA (you can also type in the event tracking parameters boxes if none of the variables are descriptive).
6. Select the Triggering box and select the + symbol in the top corner – this will allow you to create a new trigger that tells your button click tag when to fire.
Name this something descriptive such as ‘Shop Now Button Click’ in this case.
7. Choose your trigger type – because we are trying to track a button click, scroll down to ‘Click’ and select ‘All Elements’ from the list.
8. Select ‘Some Clicks’ as you do not want the tag to fire anytime somebody clicks anything on the site.
You will then need to fill in the rule for when your tag should fire – this is where the unique variable we found earlier comes in.
In this case, we may use the rule ‘Click Text’ / ‘equals’ / ‘SHOP NOW’
I have copy and pasted ‘SHOP NOW’ over from the preview window to avoid any mistakes.
You can set up multiple rules if one is not enough to make your trigger unique. For example you could also filter it to the page URL where the action occurs.
In our example, only button clicks with the click text ‘SHOP NOW’ on the specified URL will trigger the tag.
9. Click Save and reload preview mode.
Click the button you have set up the tag for – find the click in the side column and see if your tag has fired or not.
If your tag has not fired, find it in the tags not fired list, click into it and look at the ‘Firing Triggers’ – GTM will tell you which of your firing triggers did not occur. You can then go back and adjust your trigger as required.
In this instance, all of our firing triggers were true therefore the tag fired.
10. Once you’re happy your tag is firing correctly, submit your changes on the main dashboard. Make sure to add a detailed description to your version history.
11. Finally, you want to make sure that the data is being sent through to Google Analytics correctly.
Navigate to the ‘Real Time’ report and select ‘Events’ – carry out the action on your site; it should appear in the real time events section after a short time.
Setting up button click tracking in GA4
If you want to send your events to GA4, simply select ‘GA4 Event’ as your tag type and select your GA4 Configuration Tag from the drop down box.
Select the variable you want to pull through to GA4, or type in the box if this is not descriptive.
You can use the same trigger as above.
Check the data pulls through to GA4 using the real time events report.
Setting up form submission tracking in Google Tag Manager
Setting up form submission tracking is very similar to button click tracking. The concept is the same, the trigger will just differ slightly:
1. Once again, start in preview mode to understand how GTM views your form.
Ensure relevant form variables are enabled correctly
Fill in and submit the form you want to track and find the ‘form submit’ in the sidebar of preview mode.
2. Select ‘Variables’ and find the relevant form variables – again you are looking for something unique about the form variables that will allow you to set up a trigger.
In this instance, we can use the ‘Form ID’ as there is only one form on our site. In some cases you may need to ask a developer to rename certain elements if there is nothing unique.
3. You can then go back and set up your tag – this will be almost the same as it is for a button click.
Make sure to name it something descriptive, select the ‘Google Analytics: Universal Analytics’ tag type, ‘Event’ and relevant event tracking parameters. Finally select your Universal Analytics variable from the ‘Google Analytics Settings’ drop down and save.
In this case, none of the variables are particularly descriptive therefore we have typed in the box instead.
4. Next, you can set up your trigger.
Name it something descriptive such as ‘Contact Form Submission’ and create a new trigger selecting ‘Form Submission’ from the list.
5. Select ‘Some Forms’ so your tag does not fire every time somebody submits any form on the site.
You can then write your rule for when you want the tag to fire. Refer back to preview mode for your unique element.
In this case, we may use the rule ‘Form ID’ / ‘equals’ / ‘gform_1’
Copy and paste this across from preview mode to avoid mistakes.
You can add additional rules (e.g. fire only on specific URLs) if one is not sufficient to trigger your tag at only the required times.
6. Save your trigger and reload preview mode.
Fill in and submit your form once again; see if your tag fires.
7. Once you are happy your tag is firing correctly, publish it to your container.
Check that it is pulling through correctly to Universal Analytics using the real time events report.
In order to track form submissions in GA4 refer back to our GA4 button click tracking instructions.
Tracking scroll depth with Google Tag Manager
Tracking scroll depth can be a good way to measure engagement. It can tell you whether users are frequently seeing important content or whether they are simply visiting pages and navigating away.
GA4 already has a scroll event built in with its enhanced measurement feature. If you are using Universal Analytics however, you will need to set this up via tag manager.
1. First of all, you can set up your tag.
You do not need to utilise preview mode for this tag. Simply create a new tag, selecting ‘Google Analytics: Universal Analytics’ as your tag type as normal, selecting ‘Event’ from the drop down box and your UA variable from the ‘Google Analytics settings’ drop down.
Ensure the relevant ‘Scroll Depth’ variables are enabled before doing this
2. Fill in your event tracking parameters. Remember, they should be descriptive as this is the information that will be sent through to UA.
In this instance I have named my category – ‘scroll’ and used ‘{scroll depth threshold} % scroll’ as my action. I have also utilised the page URL variable for the label.
This means that in analytics, I will receive the % scroll depth a user gets down the page and the page URL in question.
3. To set up your trigger, select the + symbol and find ‘Scroll Depth’ in the trigger type menu.
Select whether you want to track vertical or horizontal scroll depth (or both) – this will usually be vertical.
Input the percentage scroll depths you want to track.
Inputting ‘10,25,50,75,90’ into the box will fire your tag every time somebody scrolls past 10% of the page, then 25% and so on. In some cases, you may only want to track when a user scrolls past 50% of the page, so adjust the figures accordingly.
Specify whether you would like a scroll depth event to occur on every page or just on some pages – you can add a page URL filter.
4. Once you have saved your tag, navigate to preview mode to check whether your tag fires correctly.
5. Publish to your site and check if the data pulls into GA correctly using the ‘Real Time Events’ report.
Tracking PDF downloads with Google Tag Manager
Certain sites, PDF downloads may be a measure of engagement. For example, if you sell a technical product or if you offer downloadable resources. Understanding how many people are downloading your PDFs could therefore be a key conversion metric.
Setting up PDF download tracking is similar to button click tracking however we will be using the ‘Just Links’ tag type instead.
1. First of all, enter preview mode in order to see how GTM sees the PDF download action.
Navigate to your PDF in the debug window and download the file. In the tag assistant look for your file download in the left hand column.
2. Look at the variables for this action to find something unique that will allow you to trigger your tag.
In this instance, we can see that GTM sees the event as a ‘file_download’ and the Click URL contains ‘.pdf’
3. We can now go and set up our tag.
Name it something descriptive such as ‘PDF Downloads’, select ‘Event’ from the Track Type menu and fill in your event parameters.
In our example, we are going to use the Click URL so that we can see which PDF has been downloaded. We are also going to put type ‘PDF Download’ in the action box and select our Universal Analytics settings variable from the drop down.
4. We can now set up our trigger. We are going to use a ‘Custom Event’ trigger and match this up with the ‘Event’ variable in our debug window.
This alone would fire the tag when any type of file was downloaded. We only want to track PDF files. We are therefore going to set up an additional trigger rule.
All PDF files contain ‘.pdf’ therefore we can utilise this to ensure the tag fires when a PDF is downloaded.
5. Save your trigger and go back into preview mode to test if your tag fires when a PDF file is downloaded.
We can see that the _event type did equal ‘file_download’ and the Click URL contained ‘.pdf’ therefore the tag fires.
6. When you are happy that your tag fires correctly, submit your changes and utilise the ‘Real Time Events’ report in Google Analytics to ensure the data pulls through properly.
In order to track PDF downloads in GA4 refer back to our GA4 button click tracking instructions.
Whilst we have covered the main tracking types you might utilise for SEO, it is important to notice the similarities between each process. Google Tag Manager is built on the premise of utilising unique variables to tell code when to fire. If you can grasp this concept, then there is no reason you can’t set up tracking for a wide range of different event types!
Still have questions? Check out our FAQ section below, or get in touch for expert help with your SEO strategy.
FAQs
What is the difference between Google Analytics and Google Tag Manager?
Google Tag Manager and Google Analytics are complementary platforms. Google Analytics tracks data, whereas Google Tag Manager sends data to be tracked. GTM bridges the gap between your website and your analytics suite ensuring that the key metrics and KPIs are accurately recorded. Google Analytics stores this data and allows you to filter and analyse it to ascertain actionable insights.
Learn more about using GTM with GA
Is Google Tag Manager difficult to learn?
Google Tag Manager is described as an ‘easy-to-use web-based interface’ for configuring and deploying tags on your website. That is not to say that no technical knowledge is required before using tag manager. Users generally need a fundamental understanding of how tags work in order to correctly configure and deploy on a site. Our guide covers the key concepts you will need before setting up your tags, as well as providing step by step instructions for common tracking needs.
How do I add Google Tag Manager to WordPress?
The best way to add Google Tag Manager to a WordPress site is with the help of a developer. A developer will be able to insert the necessary code snippets directly into the <head> and <body> of your site. If you do not have access to a developer, you can utilise a plugin. The Insert Headers and Footers plugin allows you to paste the required code onto your site.
Plugins should be used in moderation as many plugins can slow down a site and interact with one another.
What is the difference between tags, triggers and variables in GTM?
Tags, triggers and variables all have different functions within Google Tag Manager. Tags are the prepackaged pieces of code that send data to your analytics suite, triggers tell this code when to execute, whilst variables can be utilised in both tags and triggers. In tags, variables are the pieces of information you want to send to analytics. In triggers, variables are used to create rules.
Read more about the differences between tags, triggers and variables
What should I track with Google Tag Manager?
What you should track with Google Tag Manager depends on your website. For the most part, people tend to track events such as form submissions and newsletter signups, as well as engagement metrics such as video plays and button clicks. Google Tag Manager has a wide range of tag and trigger types allowing you to track almost anything you need! The important thing to remember is that you are looking for something unique about the event you want to track.
Follow our step by step guides for common event tracking types